Showing posts with label how to. Show all posts

Monday, March 13, 2017

Changing your website's domain name - a Walkthrough

Hi friends,

Yesterday I did a successful domain name migration for a client from a .cu.cc test domain to a .org final domain. (host remained the same so we did not move the site - only changed the domain / URL / address)
I've done a few earlier but there's usually some mess happening but this time after quite some corrections I managed to get some steps in order. So sharing what worked on my end.

Time warning : This procedure is one with some nervousness because there is a throw-and-catch situation : Imagine a very delicate piece of crockery has been tossed at you like a ball, coming at your hands but your eyes are closed and you don't know if it'll be caught properly or not. So it's good to plan things out and have patience. Also, in this the site's new address went "down" while the old test URL also didn't work for about 1 to 2 hours in my experience, so it is advisable to do it at a time when you're not expecting anyone to visit, like early morning or so.

Disclaimer : This is just my experience and things can go differently on your end. Apologies in advance if something goes wrong, but I probably won't be able to help you fix things.

My use case scenario : Domain (.org) is hosted on bigrock. Website is hosted on godaddy (single site, 30GB plan) and has been developed in wordpress while having a temp .cu.cc (free) domain name assigned to it. So the .cu.cc domain name was to be removed and the proper one was to be put.

Terminology : I will henceforth refer to "bigrock", "godaddy", "wordpress" to indicate the admins of the bigrock domain name management, godaddy web hosting cpanel and wordpress dashboard respectively.

1. Prep: open in different tabs and get logged in to ALL the places: wordpress, godaddy, bigrock, cu.cc. Also, note down and keep the customer care numbers of godaddy and bigrock on the side. (keep the customer id etc handy in a notepad window). In wordpress, backup everything.

2. Find Nameservers : Go to godaddy cpanel, and find "DNS management". In the new tab, choose your present site, click the settings wheel, and go through to seeing the DNS records. Now a large list of things should load, and probably in page 2 or the end you will see two nameservers listed, like "ns35.domaincontrol.com" . Copy these to the notepad window (and save!). More details here: https://in.godaddy.com/help/find-your-websites-nameservers-16140

2.1. Warning: We had got some nameservers mentioned in the initial hosting registration email, but they turned out to have been changed without any intimation from godaddy. The email said ns57/58 but in cpanel I found ns35/36. This caused unnecessary delay as for some time the new domain was pointing to the wrong nameservers. So always go into the cpanel and find the current suff and don't rely on the email if it is more than some months old.

3. Change Nameservers: Go to bigrock, open up your account domains listing and click on your domain to open its managent. Open "Name servers". Backspace out the existing ones and put in the new. Don't worry if there were 4 and you have only 2 now.. it's ok to leave the 3rd and 4th field blank. Save changes / Apply.

4. If you had earlier set this domain to redirect to somewhere else, then go to URL forwarding section (in bottom in bigrock), open it up and backspace/delete the URL completely and save changes.

4.1. Later on, in case the domain change didn't work yet, this URL forwarding could be a culprit... it might still be forwarding to an empty URL. For this in bigrock I had no other choice but to call up customer support and ask them to make sure there is no URL forwarding happening. Better to just do it from beginning, and inform them that you're making the domain point somewhere, please alert if doing anything wrong, what are the proper steps etc so all is clear from their side.

5. Ignore alerts : In the bigrock domain dashboard you will now see warnings / alerts about nameserver not being set properly. Check it out but don't change anything.. what they usually mean is that the nameservers aren't their's. That's ok; proceed.

5.1. Edit: Actually it's a good idea to take a break of an hour or more now, so that the DNS change propagates properly while your test site is still active. Didn't think of this earlier.

6. Go to GoDaddy cpanel. Find and open up the Change Main Domain name or similar sounding section. This is for changing the whole website's domain. Now.. keep this tab open but wait! don't make any changes yet.

7. Wordpress plugin : In wordpress, go to Plugins > Add new and install and activate this : "Search & Replace" See this page to verify you have the right one:: https://wordpress.org/plugins/search-and-replace/
Why this: Most online guides recommend Velvet Blues plugin, but in my experience I found that while it changes most URLs, it didn't change the image URLs of all the images, backgrounds etc on my site. I was using a pagebuilder so maybe there was some conflict there. But this plugin did the job properly. Additionally, this plugin is an open-source one (hosted on github) and gives more features free that are otherwise paid, especially the Dry Run and letting me see exactly what changes are being made.
Just install this plugin for now.. don't do anything with it yet.

8. Worpress URL update: Go to wordpress, Settings > General. Change both the URLs there to the new domain. ex: it was http://abc.cu.cc , I changed it to http://abc.org . And now we are beginning with the throw-and-catch. Go finish off your chores/toilet etc, drink some water and come back and have complete attention here.

8.1. Save Changes to save the change of wordpress URL. (press the Blue button!) The next screen should show error and in the URL bar or loading message you will see that it is trying to access the site using the new domain name. The crockery has been launched in the air. Don't panic. Proceed with next steps.

9. Go back to GoDaddy tab for domain change. Change it to your new domain. Keep out the www. etc.. just put in the name and extension like abc.org or the like. Save changes. It probably gives you some IP address and tells you to change the A record / IP addr of the new domain to this. Ignore it.. it's a flaw. When we do nameservers change, we do not need to do any of this stuff.

10. Go to cu.cc and login (or to the admin of whatever old domain you had developed the site in) Go to the management of the domain that we were using, and disable it by resetting or wiping out the nameserver, A record / IP address or whatever setting was there. If you were developing using a temp addr provided by GoDaddy (unlikely.. bigrock gives but godaddy doesn't) then don't bother doing anything.

10.1. It's important to disable the temp domain. When I didn't, my cu.cc domain was still pointing to my web sever's ip address, and visiting it surprisingly led one to a godaddy under-construction page and there was a link there that led straight to my godaddy cpanel! Serious security risk! :O

11. Recap : So we set bigrock to make your new domain point to your website's server. Then we changed the URL in our wordpress so it starts using the new path. Then we made the godaddy web hosting to change its name. Now it should "catch" the internet traffic that bigrock "throws" at it whenever anyone visits your site name.

12. It's now a waiting and praying game for the domain change to take effect, or to "propagate". Open a new tab and go to your site (new name). It probably gives an error. I found that some internet connections change their DNS and point to the new site more quickly than others.

12.1 There's a cool tool to keep track of this without wasting your time.. Go to this site : "Follow that Page" : https://www.followthatpage.com . Sign up to make an account, and add your new site name. Set the frequency to highest possible. Now that site will do the job of tracking changes for you and email you as soon as something happens. If the site name is still giving error 2 hours or more later, please call up customer care on the domain side (what to say I already wrote earlier).

13. I'm assuming that the "catch" has happened now : the website has been updated to the new domain name. Yay! Pat yourselves on the back! Now, few more steps left. You'll notice even though the site loads, images / backgrounds are gone and maybe some things look funny.

14. Login to your wordpress dashboard on the new path ( like abc.org/admin or abc.org/wp-login.php) .

15. Go to Settings > Permalinks. Set to whatever setting you want and save changes. This forces the system to set most of the internal links, menu links etc in order.

16. Go to Tools > Search & Replace. Take and save a backup of the database as advised, then go to the second tab. Search for : old site name. Replace with : new name. Keep them without http:// or other extra chars like /. (like : abc.cu.cc and abc.org ).. just keep the main stuff so you get a clean sweep. Select all tables by clicking the checkbox. Keep the Dry Run option checked. Click the Blue Button (do it!)

17. Give it time. It will come back to this page again, but on top there will be an alert message like "500 changes" or so. Click to see details. Skim through the large table that opens up, and if you need to then press Ctrl+A and Ctrl+C to copy this. How to paste : Open notepad or a simple text editor and paste. Then remove the extra lines at top and bottom, and copy this and paste into an excel and save it for your reference. You'll have all your changes in a neat table. Close the details page.

18. Repeat the find+replace, only this time check OFF the Dry Run option and click the "Save changes to database" option below it that is now enabled. Press the Blue Button again.. do it! Wait some time, and again you'll see the results.

19. Now go to your site and check it out. To ensure things, clear out your browser cache (Ctrl+Shift+Del, check off other things and keep only Cache chosen and set the time to all time). Refresh the page fully by Ctrl+F5. Or open an incognito window or another browser and visit your website from there. Now the images should display properly and the website should be fully functional (Yay! Whew! Drink water!).

20. In case something went wrong, call up any customer care that you haven't called already. If everything is ruined then apologies, but read disclaimer on top.

21. Oh ya, clean up. Log out of all the domain, cpanel etc dashboards properly, save your passwords etc securely and don't leave anything open for your cat to come and accidentally delete everything. And you might want to go back to Follow that Page and delete the site check. (just remembered!) (don't worry, pressing Delete button on followthatpage site cannot and will not delete your site. It only disables the site-checking service)

Happy Migrating!

Wednesday, December 7, 2016

Seeing contours for a location

1. Go to http://www.gpsvisualizer.com/map_input
2. If you have a .kml of your chosen location, upload it. If it's in another format, you can use geojson.io or mapshaper.org to convert it to .kml or .gpx.
3. If you don't have any file, find your lat-long location and type it into the given textbox in the way they've instructed.
4. Click on "Draw the map" button. In the window that opens, change the map layer to "OpenTopoMap" or "OpenCycleMap". They show the contours with height in meters.
5. Go back to the Make page and change the settings, like width n height default zoom level etc to get the map you want.
6. There will be a link to download the page showing the map to your computer, so you can just open in next time (still needs net) without having to enter all these parameters.

Printing / Taking large screenshot:
1. Do this on Firefox browser; Chrome doesn't have this feature yet.
2. Create your map with larger width and height, and high zoom level. Through trial and error, adjust these to get just the right large map window (use scrollbars to move in it) that shows all of your area at the zoom that you want and you don't need to click-drag the map.
3. Now screenshot the entire window (including the portions out of view). Press Shift+F2, a command console opens at the bottom. Type in this command:
screenshot --fullpage

4. The screeshot is saved either in the downloads folder of your device, or it asks you where to save it and what name to give.

Some more tools:

https://mappingsupport.com/p/gmap4-free-online-topo-maps.html
fullscreen:
https://mappingsupport.com/p/gmap4.php?ll=18.751778,73.551396&z=15&t=t1

http://contourmapcreator.urgr8.ch/

Friday, October 23, 2015

Unsolicited tips for people who are starting with blogging

To people who are starting with blogging.

1. Only write what is coming from your heart. Don't care about what others will think, at least at the creation stage and in over the intial couple of years. Then after posting, reading it yourself (explained further in point 4), receiving feedback through comments, your friends telling you personally, will automatically lead to the improvement you wish for. So focus on a post-feedback model instead of a pre-feedback model. ie, put it out there first, take feedback later. At least that's the way I managed.

2. We actually don't need others giving us feedback SO much. Little was ok, but you're growing up in a time when this stuff has gone depressingly out of balance. So we need to learn to inculcate a slight, healthy disrespect for the opinions of others, to counteract the imbalance that we have today.

3. There is no hierarchy of subjects. A love story or some courage story or something soccer related are as great, as important, as valuable as any social issue commentary. In fact, stories are instrumental in scripting the future : they visualize imagination, bring it to life, and inspire others to act on their imagination. And speaking of stories, check this out : http://nikhilsheth.blogspot.in/2013/01/eklavya-20.html That's ONE story I came up with after being exposed to social commentaries on caste injustices, etc, and it's something that I keep returning to time and again to remind myself of things. It's my personal favorite work. I haven't bothered trying to make stories after that as that kind of stuff just wasn't happening with me. If you have stories flowing out of you then I really envy you!

4. Writing is actually very much like Eklavya's arrow shooting learning. He didn't really need others to tell him that his arrow has not hit the target. Itna toh saaf saaf dikh jaata hai. After writing your stuff, go away for some days, then come back and see the published thing (yes, it is important to see it actually published rather than in draft form) with a new set of eyes. Read your own article from start to finish, and if my guess is right, I think you will feel like this has been written by someone else. That is because : 1. We are constantly changing, and 2. Our thoughts aren't really coming from inside our brains. But that's a topic for more eccentric research later.

5. Carrying on from last lines of previous point, this realization has brought out to me the flaws in our university Literature etc courses where there is so much unnecessary dissection of writers and attempts to make connections and draw conclusions on what the guy's personality was and basicaly judging people in such abstract unrealistic ways. Everybody is ever-changing yaar. No need to fixate.

6. Check out https://storyweaver.org.in

7. Now this is a difficult one even for me : Don't delete the posts that you later feel unhappy with. Instead, write it afresh and post it as v2, v3 etc. If possible, cross-link between them. If you feel really embarrased with one work, be open about it and publish that you're not happy with the earlier version. This will give everyone a chance to witness your journey in writing. Kind of like in wikipedia when we go into seeing the page's history and see how it evolved over time. All that said, there will always be stuff that needs to be deleted so proceed and use the deleting power of digital publishing.

8. Technical tip : I always blog by email-posting : it's sooo convenient. And this way I can simply forward excerpts from ongoing email conversations that I want to post to blog, or emails I'm sending. You can configure a secret email address in your blog's settings, save it in your contacts list on gmail (just send to it once). Note: if you're having a phone number or direct email address in the email's signature or content, remember to remove it before sending to blog. (You know what, after I send this to you I'm going to edit and forward this to my blog as well, with name and all redacted of course)

9. Put the link to your blog in your email's signature (ie, don't write it in everytime.. go to your email settings and write out a full fledged signature, so that it automatically comes at the end of all your emails. Got a quote you love? Write that over there as well!). And similarly link to your blog on your social media profile etc.

Friday, September 18, 2015

Setting up Mobile based Field Surveys for Dummies

Edit: Ona.io has changed a bit since when I wrote this. Will update it in some days.

I'm going to lay out what works, and no, it's not the proper way. But
it works, and it's about as difficult as setting up a facebook
account.

## GETTING STARTED WITH MOBILE BASED FIELD SURVEYS, FOR DUMMIES ##

1. Go to http://ona.io and sign up, create an account.

2. Start by duplicating existing stuff. Go to https://ona.io/forms/,
search for "nikhil", grab one of those excels.

3. Login on http://ona.io, upload one of the excels which is an XLSForm.

4. On your phone, install ODK Collect :
https://play.google.com/store/apps/details?id=org.odk.collect.android

5. On your profile / dashboard at ona.io (ie, the first place you see
after logging in), read and follow the instructions at the bottom to
hook your ODK Collect app with your stuff. Basically it's about
setting the server as https://ona.io/[your usename]

6. in ODK Collect app, "Get Blank Form", you'll see the form you
uploaded in step 3.

7. Now "Fill Blank Form", fill it up, and after completion, "Send
Finalized Form"

8. From the computer, on your dashboard,
https://ona.io/[your usename], you'll see the form has gotten an entry. You can see the
data in a table, if you geo-tagged it then you can see it on a map.
You can even see any photo you submitted in the form.

9. To use the data collected in your own programming, like a map or a
data visualization, go to this URL :
https://ona.io/api/v1/data?owner=[your usename]
..and follow your way through. (you might need to set the form's data
as public by going into the form's profile page)

10. And then many things you can do depending on how you want to apply
the data. HERE you would need a programmer who understands Javascript,
JSON and HTML. Till this point, you didn't really need any
programmer.. it was all point and click.

11. Open up the excels you downloaded, understand the way it's
structured, look up on http://xlsform.org/ for full documentation, and
reverse-engineer it to create your own surveys.

Monday, May 18, 2015

DIY PDF to Excel / Spreadsheet conversion

1. If you want to do multiple pages at a go, then you'll first need to extract just those pages from the bigger document. For that, you can use:


2. Then, this site will convert that pdf to excel for you.. it was pretty accurate for me:
If not that, then my second choice is: 
You might have to clean up the converted excel, re-align stuff, etc.


3. In case it's just a few pages, or if you need a specific part of the page only, then better to use Tabula: 
It's a portable software that runs on your computer, works through your browser. You visually draw a box on the page and it converts that to table. Either copy it to clipboard and then paste in excel using import text wizard, or save it as CSV and then load it in excel.


4. Now, the converted file may have weird characters, if your document was using legacy fonts like Shree-Dev to display vernacular language data.
Here's a site having converters to convert such text to Unicode format, which can then be read, copy-pasted, searched:
You'll get HTML files that have scripts in them. Save them locally and run them in your browser. (note: certain browsers might block the script from working unless you activate it.)

For Pune's Budget book, which was using a font similar to but slightly different from Shree-Dev, I made a customized converter, you can copy it from here:
Convert, copy, and in excel, select just the topmost cell of your selection and press ctrl+v. all the cells you originally copied out from should be replaced.

In case this was in regular ShreeDev font, try this:

The text might get garbled up in the pdf-to-excel conversion. Try this mid-development version of Tabula: https://drive.google.com/open?id=0B3gxOiUzXTR-VkRmU1I3MElXYncGo
For more details, see this thread: https://github.com/tabulapdf/tabula/issues/303 . It handles legacy Devnagri scripts and does the conversion perfectly without distorting.
(Not confirmed but might work better with other Indian scripts too. But doesn't work with Unicode well the same way all others don't.. that seems to be an inherent problem in PDF technology.)

If is still happens (happened a lot on my end and later I got Tabula devs to fix it), then you have to copy-paste the text from the pdf. Press and hold the Ctrl, Alt buttons and draw a box (box-select) in the pdf-reader, that should let you select all the text in a column. First paste that in a simple text editor like Notepad.

Where there was more than one line of text in a cell, you'll have to "unwrap" them back to one line. (switch off wrapping by Format > Word Wrap). Where there were blank cells, you'll have to press enter, enter to space out the lines. Once you're sure it's exactly as it was in the PDF, then you can safely paste it back to the excel. Use the adjoining cells to make sure the stuff is well aligned.


5. For the figures, if they have commas like this: 52,50,000 then they'll be stored in the excel as text, not as numbers. To make them as numbers, select all the cells having the numbers, copy, and paste here:
..and press "zap commas". Copy the output and paste it back to the excel, with the first cell of your copied block selected.
(you can look for other such converters too or just make your own.. my file's source code is here: https://gist.github.com/answerquest/273360c7098428f2449a

Sunday, June 8, 2014

HOW TO send audio to the HDMI-connected TV

We now have HDMI cables to connect the laptop to a projector or large LCD/LED TV for screening something.
The HDMI cable also sends sound; and if you're screening movies etc on a big-screen TV, then it's best to use the TV's own audio rather than getting a separate set of speakers.

But you might find it difficult to get the sound to come on the TV instead of your laptop. Ideally this should happen automatically but I guess we'll have to manage with some manual tweaking right now.

If you're playing video on VLC player, you have to go to Tools > Preferences (or hit Ctrl+P on keyboard)
See the screenshot below... 
click to enlarge

1. you have to set the Preferences window to show All settings (bottom left)
2. Navigate to Audio > Output modules > DirectX on the left side tree
3. Your plugged in HDMI device should appear in the dropdown list on the right. Choose it.
4. Press Save button on bottom right.
5. Don't panic if the sound is still coming from your laptop. You have to STOP the movie, and start playing it again for the change to take effect.

I went through some trouble to get this straight. Here's hoping you find it easier. Once done, you can really feel the difference as the sound comes on the TV nice and loud.

Note: You'll probably have to use the same technique to change it back when you want to hear sound on the laptop again. Don't panic if you're playing a movie later on and there's no sound coming!

Thursday, March 7, 2013

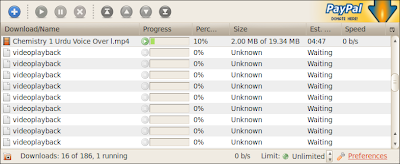
Download and distribute Khan Academy hindi/urdu videos

Follow the instructions below, to download these Hindi-language educational videos from youtube (the whole lot!), and then distribute them to learners who are more comfortable in Hindi / Urdu :

1. You should be using Firefox web browser : http://www.mozilla.org/en-US/firefox/new/

2. Install this extension: http://msram.github.io/bytubed/dev-versions/1.1.2a2.xpi (save to your computer, then drag and drop it on top of the open Firefox browser.)

3. Install this extension: https://addons.mozilla.org/en-US/firefox/addon/downthemall/ (download manager)

4. Restart the browser (or close and open again)

5. Go to the Chemistry Humari Boli page: http://www.youtube.com/playlist?list=PLB45AB2F6BC5D1813

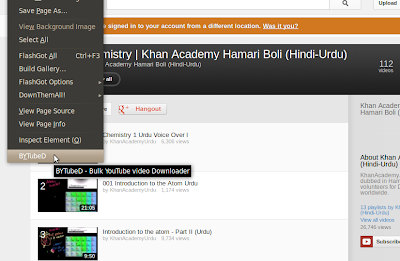
6. Right-click in a blank (non-clicking) space and select "ByTubeD"


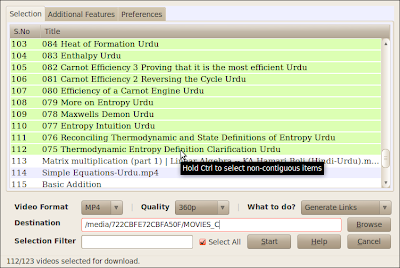
7. A selection window pops up. There are 112 videos on this playlist. So select All, then scroll to the bottom of the list and de-select the last few videos by pressing and holding Ctrl key. Set the settings to how you see here: MP4 360p quality, Generate Links. Keep any destination folder for now. And then press Start.


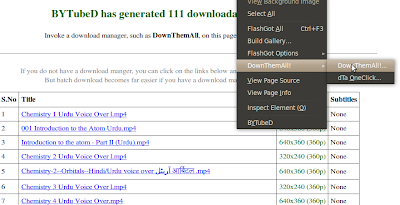
8. Wait for some time. It will process all the videos one by one. In a minute or so a new page will be opened in Firefox with all the videos listed. Here, again in an empty space, right-click and select DownThemAll > DownThemAll


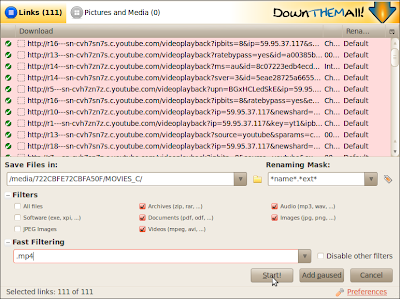
9. Another window pops up. Choose your folder, type ".mp4" under Fast Filtering (this should select all our files), and Start.


10. Now your downloads should start. All the best! Please repeat the same for all such collections...


call me up on +91-966-583-1250 if you have any questions!
Cheers!
Nikhil

Wednesday, November 14, 2012

How To watch subtitles on VLC better

If you're watching movies with subtitle files on VLC player, chances are you'll find it a bit difficult to read.
So here's a quick way to change the subtitle display to make it better. I'll explain through screenshots:


You'll have to stop playing the movie (not pause; stop) so the changes can take effect.
Then sit back and enjoy the show. Here's what it'll look like:


And in case you're curious, the video is a paradigm-shifting documentary on education from: http://www.educacionprohibida.com
It's in Spanish, but google-translate does a good job : http://translate.google.com/translate?hl=en&sl=es&tl=en&u=http%3A%2F%2Fwww.educacionprohibida.com

Wednesday, October 3, 2012

Guides to help with typing in and publishing in Indian languages

Recently I've created a few step by step walkthroughs to help with Indian languages, check them out:

Display Indian language fonts properly in your PDF (In Hindi and English language)

Typing in Gujarati in your computer (in Gujarati and English language)

Have hosted both of these on ISSUU - it renders your documents into a beautiful page-flipping book.

Installers for languages other than Gujarati:  https://www.dropbox.com/s/epsuewyy5fsb7hs/google%20languages.zip

Friday, June 1, 2012

Using BYTubeD in Firefox to download lots of videos from Youtube

1. Use Firefox web browser. (get the portable version here)

2. Go here: http://msram.github.io/bytubed/2013/02/11/new-development-version-1-1-2a2.html and install the BYTubeD extension.

2.1. Also go here:  https://addons.mozilla.org/en-US/firefox/addon/downthemall/ and install the DownThemAll extension.

3. Restart Firefox (or just close it and open it again).

4. Go to this page which has a list of Youtube videos. (this is a list of all Khan Academy videos under a specific subject)


5. Right-click anywhere in the page (and by anywhere I mean DO NOT click on a link! There's so much more free space, use that!)

6. Choose BYTubeD

[Image]

7. Now a smaller window opens up. Wait a minute or two, and BYTubeD will enlist all the youtube videos with their original titles. Green means... green!


[Image]


8. Go to the Preferences tab and select the second option "Preserve order..." if you want to keep the files you're downloading in order. (in this example, that's important because it's a lecture series)

[Image]

9. Other things... choose your preferred Video format..

10. For "What to do?", choosing "Enqueue... " will directly start saving it all using the normal saving mechanism. Not recommended. Better to choose the other option and it will make a page with the links listed and you can either select each one and download, or use a download manager like DownThemAll! to save them all.


11. Enjoy!

Saturday, May 26, 2012

Panorama creation using Dermandar

http://www.dermandar.com/create/

Wow, this thing is FAST!

I took some pics with the mobile, transferred to comp, selected them here and in a few seconds a 360 degree view was ready!

I got confused at the next step as there was an 'Upload' button as well as 'Save As' and I was thinking that what the heck, I have already uploaded the pictures. But actually, the website creates the panorama on our computer itself without doing any uploading. (I'm impressed!)

So now I press Save As and download a big stitched image file to my comp, and after that I press Upload, next screen it takes the panaroma's name and details. And THEN it takes a long time to upload the whole thing.

So, check out this address:

http://www.dermandar.com/user/nikhilsheth/

And.. we can embed it!


edit: changed to another higher res panorama we made later in the day

This panorama was made out of 9 photos, one of which is below:


use the Flash embed option instead of the default HTML5... the default one isnt working on my tiddlyspace at present.

more articles from the web.. on how we can create virtual tours..

Poor man's virtual tour with Dermandar

http://www.dontwasteyourtime.co.uk/apps/dermandar-photography-app/#axzz1vwLGqe1U

Remember, this is all for FREE!

Friday, December 16, 2011

HOW TO deploy Wikipedia for Schools offline encylopedia on school computers

Bridge the internet divide; spread the light of knowledge to school computers the same way you share movies and songs with your friends: with Ctrl+C, Ctrl+V and a few clicks!

https://commons.wikimedia.org/wiki/File%3AOffline_Wikipedia_install_guide.pdf

Thanks to Jessie and Emmanuel for their support and faith; it's an honor to be collaborating with you on this project!

Nikhil Sheth,
Teach for India Fellow, 2011-13
Grade 3 teacher, Shantabai Ladkat School, Nanapeth, Pune

Sunday, February 27, 2011

Changing profile/index location for Kiwix on Windows

Quick primer : Go to http://tinyurl.com/WFSOE
Changing profile / index location for Kiwix on Windows. This can also be taken as a guide for pre-installing indexes for your zim files.
1. Go to a path like this: E:\Users\NIKHIL\AppData\Roaming\www.kiwix.org\Kiwix
--this path is for Windows 7 and Vista and on my PC the OS is on E: drive; for Windows XP it would probably be like
C:\Documents and Settings\Nikhil\Application Data\www.kiwix.org\Kiwix
2. Open profiles.ini to edit (just double-click or open with Notepad or whatever text editor you use)
Add these lines to whatever’s already there:
[Profile1]
Name=Localize
IsRelative=0
Path=C:\Kiwix Profile
Default=1
----------------
3. Make the new folder (“C:\Kiwix Profile” here), leave it empty, run kiwix once and then close it. After running you'll find all sorts of files have been created inside "C:\Kiwix Profile".
4. Shift the index folder from old to this new profile folder and rename it to something legible like "wikipedia_en_wp1_0.8_45000+_12_2010_rc1.zim.idx" (note: this is a folder, not a .idx file. All index folders have .idx or .index at the end.) so you can identify it with your zim file rather than those weird long alphanumeric names. See the library.xml in the old profile folder to figure out which .idx folder is for which zim file in case you’ve loaded multiple zims by now.
In case you don’t have it already, I’ve uploaded some indexes (incl. for the latest english wikipedia zim) on this shared online folder: http://www.4shared.com/dir/ua44LHvy/Indexes.html You can directly download and unzip them to the new profile (using 7-zip).
5. Open library.xml inside the profile in a text editor and make a change like this:
<library current="4dd18dea-9afd-080a-080a-50c68d62072f5675"><book id="4dd18dea-9afd-080a-080a-50c68d62072f5675" path="C:\Wikipedia\wikipedia_en_wp1_0.8_45000+_12_2010_rc1.zim" last="1298420521" indexPath="C:\Kiwix Profile\wikipedia_en_wp1_0.8_45000+_12_2010_rc1.zim.idx" indexType="xapian"/></library>
Take care of your absolute paths.
6. To add more indexes, simply repeat the steps and remember to vary the ‘book id’ variable in library.xml. Also you may set last=”undefined”. It should all be between the <library …> </library> tags.
7. Now run Kiwix again. Hopefully it should be done.

Saturday, January 22, 2011

Troubleshooting the Wikipedia For Schools Offline Edition + Call to Action

DSC02634That big term shall henceforth be referred to as WFSOE (wow, sounds like a cool game! As it should!)
In my pilot drive at Shantabai Ladkat school in Nanapeth, Pune, I came across some issues when installing WFSOE on some older computers: The indexing process never took off. Now, indexing is what kicks in the first time you open a .zim file in the primary form of Kiwix (the software used here.. look, just go with it, ok?) – it’s necessary if you want to be able to Search thru the WFSOE. So that’s a dilemma : a whole encyclopedia and we can’t even search our favorite topics! So, started looking around.. and thanks to a comment on my original post on WFSOE, I started downloading the pre-indexed, ready-to-DVD version of WFSOE that the awesome folks at Kiwix.org prepared:
http://download.kiwix.org/portable/wikipedia_en_for_schools.zip
Note: Don’t start downloading it yet – it’s freakin’ huge – 2718MB direct download! And, as in many such ventures, I detected a problem only AFTER fully dloading it over 3 days! I can’t say whether the issue is there in the original file hosted on kiwix.org or if it crept in during my downloadathon, but that’s just it – huge file direct download = Russian Roulette. This blog post is the story of that issue, how I hacked my way past it, and the solutions for anyone who wants to download a good, awesome, readily working version of WFSOE. To make things interesting, we’ve got screenshots galore!
Expand this article to read thru it… long length!
If you’re looking for the wiki page, http://education.wikia.com/wiki/Wikipedia_For_Schools_Offline_Edition (short URL: http://tinyurl.com/WFSOE)

If you’re just looking for the Call to Action, go to the very end after expanding.

Tuesday, January 18, 2011

Google IME and Wikipedia (हिंदी में)

नमस्कार | मैं निखिल हूँ.
और मैं अभी google IME का इस्तमाल करके हिंदी भाषा में लिख रहा हूँ |
(English translation : I'm using Google IME to write in Hindi.)

इसका एक screenshot नीचे है :
-------------------------------------------------
----------------------------------------------------------
------------------------------------------------------------------------------------------

इसका सबसे बड़ा फायदा ये है की हमें पूरा शब्द लिखनेकी ज़रूरत नहीं पड़ती | यह खुद ब खुद तोल मोलके शब्दों की लिस्ट सामने ला देता है |
जितना ज्यादा इस्तमाल हम इसे करें, ये उतना अच्छा होते जाता है.

हमारे कंप्यूटर में ही एक भाषा की तरह ये install होता है, और इस तरह हम कहीं भी अपनी भाषा में लिख सकते हैं |
भाषा बदलने में भी कोई time नहीं लगता, जैसे इस फोटो में दिखाया गया है.
--------------------------
-------------------------
बस वो नीचे का 'अ' दबाइए (या CTRL+G) और वापिस english पे आ जाइये, फिर वापिस हिंदी पे | ये मेरे लिए बहुत important है, क्यूंकि मुझे शुद्ध हिंदी नहीं आती ;)
हम नीचे का keyboard button click करके complex अक्षर भी दाल सकते है | जैसे की श्र, ऋ, ॐ, ज्ञ, ऽ

इसको आप यहाँ से install कर सकते हो :
http://www.google.com/ime/transliteration/

उनके Help Section में अच्छी तरह से सब बताया गया है.
मैं मुंबई में wikipedia की दसवी सालगिरह (15 Jan 2011) पर किये गए function में गया था, VJTI college में. वहाँ मैंने कुछ नए दोस्त बनाए, उनमे से Mr. समीर शाह ने मुझे इसके बारे में बताया.
---------------------------------------------------

(होलाल्केरेजी, निखिल (मैं), समीरजी)
-------------------------------------------------
समीरजी एक retired software engineer हैं , जो विकिपीडिया गुजरती में खूब योगदान कर रहे हैं, येही Google IME का उपयोग करके | एक और senior citizen मेरे अच्छे दोस्त बन गए, Mr. होलाल्केरे लक्ष्मिवेंकतेश, जो कन्नडा में योगदान कर रहे हैं | उन्होंने http://www.baraha.com/ का बराहा software use किया है google IME की तरह ही है.
तो भाषा की सीमा पार करके आप भी अपनी मात्र भाषा की विकिपीडिया पर लग जाइए, बहुत मज़े वाला काम है !

हिंदी : http://hi.wikipedia.org
गुजरती : http://gu.wikipedia.org/
मराठी : http://mr.wikipedia.org/
कन्नडा : http://kn.wikipedia.org/
और भी अनेक भाषाएँ हैं इधर!


Friday, October 29, 2010

How To publish direct download links to your Google Doc

google_docs_logoScenario: You have a google doc whose contents you’re sharing with your friends and the world (ie, it’s publicly viewable)
This is a great alternative for publishing or sharing something big when you don’t have web designing skills or the time to set up something like a blog, or in sharing something among members of a team like the minutes of a meeting, or if it’s a one-off thing.
In case the document (can be a spreadsheet or presentation or drawing too) is big and you want to give the opposite person a way to save it for seeing later, then here’s how. Click on the expand link below to see the step-by-step procedure.

Sunday, September 26, 2010

How to Play FLV files anywhere on your computer

This is funny.
When I was using winXP, I'd installed this amazing codec pack called CCCP (Combined Community Codec Pack). At under 10mb, it supported all the video formats including FLV without any problems. And I mean I could play ANY video file in ANY software - windows media player, winamp... you name it, this baby would play it.
When I switched to Win7, the OS itself natively supported playing all sorts of .avi and .mp4 files that I threw at it. But not .flv 's. I installed CCCP there, but even then it wouldn't. I re-installed it, tried some other some codecs too. No avail. To make matters worse, VLC would play only the video and no audio for some reason.

But just now when I clicked over to the CCCP settings in the Start Menu and did God knows what, but suddenly I can play all FLV files anywhere in my win7 laptop.
So.. why is this funny?
Because I've spent half a year playing all my .flv's in a shoddy 3rd-rate flv-player that can't track most files properly, doesn't have volume boosting/normalization, lets the screensaver come on while I'm sitting back and watching, doesn't have any decent hotkeys and makes the videos look pathetic with jagged corners in fullscreen, that's why!
#%@&$*&%#$%#!

So, guys, if you wanna play .flv files in your system, make sure the CCCP settings (2 consecutive windows) look exactly like the screenshots here. Expand this post to see them

Thursday, September 16, 2010

Walkthrough: Become a social investor with RangDe in 10 easy steps

  1. Go to RangDe.org
  2. Create an account - 'Register' link on top right (you can just sign in with your gmail id)
  3. Browse thru the Borrowers - find whom you want to invest with.
  4. Enter the amount you want to invest (in multiples of Rs.100) next to the chosen borrower's profile, and hit 'Invest'
  5. Click 'Check Out' on the top.
  6. Click 'Continue' at lower right below the borrowers summary
  7. At the 'Support RangDe' page, you may choose to forgo the basic interest you would be getting, or put in some more .. this is strictly a donations page and you can skip it also, press Continue at bottom.
  8. Now at the Make Payment page, you can choose how to make the payment. If you already have some money returned from a previous investment, it'll show up here. I found Debit Card payment the best option, as there's also an additional protection of "Verified by Visa" on my debit card, and no transaction charges.
  9. In case you have a Gift Voucher code with you, can use that too. You can use all these modes of payment together. Press 'Continue' at bottom and you will have the regular payment portal.
  10. It's done! Now every time you come back to RangDe and login, you'll get to see whom you've invested with in 'My RangDe' section. Also you'll get email alerts periodically. Over the months you'll see the borrower repaying you in installments. Whatever amount is repaid, is immediately made available to you to re-invest or withdraw. (Example: I've invested since May, already have got Rs.300 back to re-invest, withdraw or Gift) So you can take back half this money in 6 months also.
Happy Social Investing!
Learn more about how RangDe works here.
Find them on Facebook here.
Click expand to see a video tutorial.

Starting a Toastmasters Club

The following is an addition I've made in LinkedIn in the District 82 Toastmasters group discussion titled "What are the best strategies to start a new club, which shall not die irrespective of circumstances ? Share your thoughts"

Hi guys! I now feel like an idiot after reading many good strategies.. we started a club in TCS Gurgaon in April 2009 and have literally lived through the phrase "Fools rush in where Angels fear to tread" ! We were just 2 junior-level employees committed to "the cause" - myself being the only one who had any working knowledge of "this TM thing" - all of 4 months and 2 or 3 speeches (!!). All I knew at the time was the roles in a meeting. Every week from April through June we held a demo meeting, and we'd get 2 people signing up and 1 backing out because of on-site or off-job (the good guys usually leave!).

After lots of stumbling and frequent guest appearances, encouragement as well as outright scolding (very helpful!) from the area, division and district governor, we accumulated a good enough number of comrades to call ourselves a "club"!. In June 2009, we told 23 people, individually, that 19 others had already signed up to be charter members and we just needed one more (everyone is so reluctant!) And it worked!!

Even after charter, it was hectic just getting the meetings on (including scraping the HR and Admin week after week for venue and having several last-minute dropouts), but once we were into one, the sheer experience just propelled us forward. I served as Vp-Ed and then President. We went through times when only 1 or 2 or 3 EC members would be around. But fortunately the intrinsic value of TM kept attracting more and more people (and sending a good number to onsite, MBA and job hops as well so it was net neutral!).

Over the course of a year, I learnt a valuable lesson as a club leader : We have to let go, put our faith in others and trust that things will work out. Planning helps a lot but it can never cover all the corners as effectively as faith, optimism and on-the-spot thinking can.

I'm proud to say that we've come a long way and achieved many awesome things out of sheer trial and error even though they seemed impossible at the outset. We've even hosted area and division level events and were able to give back to the fraternity. After an year+, I am now an un-involved past member, have left TCS and our club is being run by brand-new TM's who are taking on the leadership roles enthusiastically. In fact, club performance has improved AFTER I've left. (which proves the argument that governments and diapers should be changed frequently, and for the same reason!)

I'm not sure if what we did would work elsewhere, but for me, here's the strategy to start and run a club that won't die out:

1. Lead by example.
2. Learn by doing.
3. Learn from others' examples. Attend other clubs.
4. Take baby steps and then the occasional leap of faith.
5. Be persistent and optimistic with tasks, but patient and neutral with people.
6. Any idiot can do whatever you're doing, so delegate away!
7. Planning helps, but never get religious about sticking to it. Let things be dynamic.
8. Never discriminate between members. There is no difference between a novice and an advanced speaker/leader during a meeting. Treat everyone equally.
9. Share all knowledge and decisions with everybody. Don't keep a critical dependency with any 1 person, including yourself.
10. Enjoy the journey with all its roadblocks. Don't worry about the destination.
11. Believe that the Toastmasters concept can carry itself forward, you just have to pass the baton and get out of the way.
12. Do not let permissions, authority or limitations hinder the club. (esp for corporate clubs!). You can always find a workaround.
13. There is always a plan B, even if you haven't thought of it yet.

Thursday, June 4, 2009

HOW TO use Google Maps on your cell without internet connection

Google Maps is a terrific application. It gets even more awesome when you have it on your cellphone.
However, there's a catch... internet connection is a must. And, since it's all images, Google Maps is a pretty high volume app, continuously downloading some 100 kbs of data for everytime we move on the map! They do have a cache size but it's pathetically small, and invariably we need to dload when we move the map from A to B.

I thought there's no other way, until I came across this free mobile app: Mobile GMaps.
It's made by somebody else, open source, free, and it has truly empowered me by freeing me from my oppressively priced mobile net connection, and giving me the entire detailed road map of NCR region right on my cell phone!!

Do YOU want this on yours?? Well, of course you do! Here's how:

Gift Economy

Would you like to show your appreciation for this work through a small contribution?
Contribute

(PS: there's no ads or revenue sources of any kind on this blog)

Related Posts with Thumbnails